When you start the year heartbroken and scared to start again, where do you go? In my mind, being 32 meant looking forward to getting married, starting a family, buying a home. Life had other plans for me. I took some time to reflect, and I started by selecting an annual theme. It was my “Year of Challenges”, where the theme at first meant to start again and regain a sense of agency. It ended as a way to look at events outside your control.
Wake Up Call
One of my biggest takeaways from the past year came from the book “Four Thousand Weeks ”, by Oliver Burkeman. “Seek out novelty in the mundane”, Burkeman writes. When you’re a child, more experiences are novel because those are first time experiences. When you’re an adult, most experiences are mundane because most experiences are routine. Burkeman’s suggestion for making those mundane activities novel is to take the time to notice them and reflect.
A way I’ve been tracking this is by utilizing a second brain and reviewing notes that I’ve saved throughout the week. Little tidbits from articles I read, ideas that are in their infancy, potential future projects I may want to start. It’s like reviewing your journal in a more systematic way, and remembering what your past self said to help inform your present self, and potentially make decisions for your future self. (In the future, I will write about my experiences with developing a second brain, what it means, and how I utilize it).
How Love Lasts
I never expected the year to be where I entered heart broken, and exited engaged. I had a lot of re-learning to do when it came to love. Furthermore, I read through How Not To Die Alone by Logan Ury to be an indispensable resource. Some big takeaways were “Date for a life partner, not a prom date”, and “Screw the spark”.
I had this erroneous belief that you should wait three years to propose to someone.
Year 1. The honeymoon phase.
Year 2. Share life experiences together through integrating with your partner’s family and friends.
Year 3. Share a home together.
But when you know, you know. Instead, I scrapped waiting years and I jumped straight to the ring and question. I was second guessing my plan. I wanted to surprise her at a rose garden in Oakland, but it was far too dark when we arrived. She was annoyed by the midterm elections, and I was thinking, what could a Plan B mean? I proposed in front of Fenton’s Creamery, and her annoyance became a delightful surprise. She was in tears, and I’ll never forget that moment.
A Run To Remember
I ran a marathon! I hadn’t been to the gym in two years, neglected my physical health during the COVID years, and was afraid to start working out again. What was different from the last time I found myself in similar circumstances was that I learned many lessons from my former physical trainer. I found an accountability partner in a friend who moved back to the area.
At first, it was just running every Saturday morning at Golden Gate Park. Then a different friend suggested I run the SF Half Marathon with her. I created a daily workout plan to get myself back in shape in 7 months, and it paid off. I ran the fastest half-marathon I could ever ask for, and it felt much better than the past two years combined. My biggest hope is that I take this feeling away with me for future years to come.
Exiting Thoughts
I intend to write about more experiences in short essays. Returning to writing is scary. I remember the video Ze Frank made about the “An Invocations on Beginnings”. He says “Let me think about the people who I care about the most, and how when they fail or disappoint me, I still love them, I still give them chances, and I still see the best in them. Let me extend that generosity to myself.” I think it’s hard to give yourself another chance, and easy to say “I’ll do this again another day”. Writing was my form of zen, and I miss it so much. Please consider continuing to read what I have to write, and support me in future endeavors.
I decided to re-write my personal website back in 2017, when I was much more active in writing on my blog. However, that changed quickly when I abandoned making updates in 2018 when I started my job at Clear Labs. There was no longer any time to write as we were working on their Clear Safety product.
I’ve had one or two failed attempts at doing a full re-write, and never fully committed to doing it until this past month. Part of the reason is I dreaded the migration from Jekyll. I knew most of my content was in markdown, but there was this fear in the back of my mind like it was an insurmountable task. Of course, that’s a fallacy, and when you know you could do other things with your time, this project inevitable went into my backlog.
Comeback with Astro
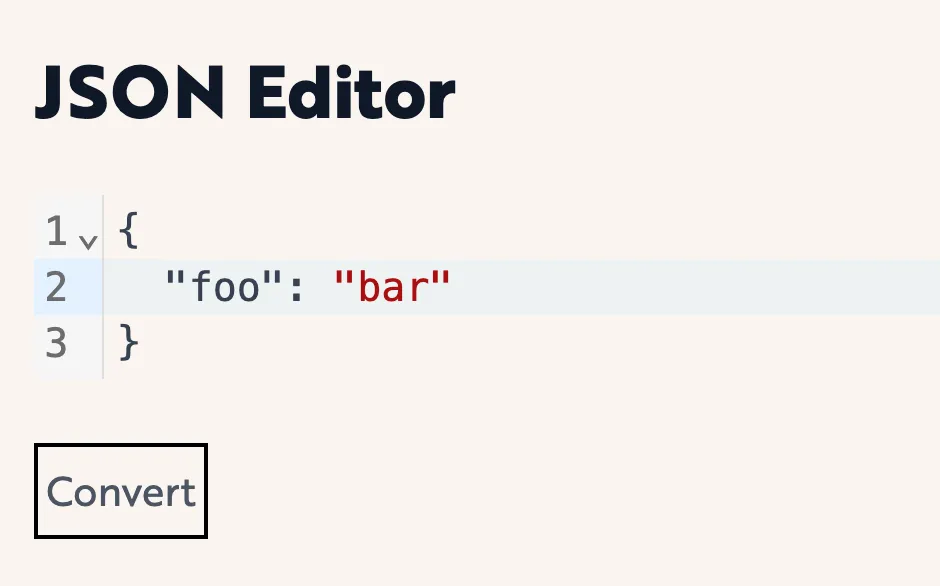
I’ve been itching to write again, and the urge trumped my fear of the migration. I decided to use Astro as my static site generator, with plans to run it as a server as a future. I wrote a small project in Astro, and thought how delightful it was, so I decided to see what the starter had for its blog starter kit. I was pleasantly surprised. It had a great base foundation to start migrating over blog posts, as long as I followed their markdown frontmatter, typically written as Yaml. By taking a look at their base schema, I could easily re-adapt the posts and get something rendering on the page write away.
import { defineCollection, z } from "astro:content";const blog = defineCollection({ // Type-check frontmatter using a schema schema: z.object({ title: z.string(), description: z.string(), // Transform string to Date object pubDate: z .string() .or(z.date()) .transform((val) => new Date(val)), updatedDate: z .string() .optional() .transform((str) => (str ? new Date(str) : undefined)), heroImage: z.string().optional(), }),});export const collections = { blog };
I needed additional metadata for my blog posts, like tags, post type, and a boolean for whether it was a draft.
I’ve created Next.js and Remix projects before, so the file-based routing system was intuitive. The preset included a blog folder with an index.astro and [[...slug]].astro file pre-filled. This made it super easy for my to figure out what was going on by reading the code and commenting the parts I didn’t understand.
After the blog posts migrated over, I quickly threw myself into the other pages that weren’t migrated over, specifically the about page, projects, logs, and newsletter series. Each of those became their own schemas. I updated their markdown frontmatter as well, and the personal site started to look like my old site again.
Deployment
The website was using Netlify, and while I personally would’ve preferred Vercel, it was a good choice. I setup some Github actions to continue to push to Github Pages as well. Netlify’s migration was a pain, because the configuration and its cache were set to build to Jekyll’s configuration. Migrating it over to Astro took some finagling to get the settings just right. I spent a good evening scratching my head until I found the correct environment variable to set it to.
A Side Note about Git
I created my old blog back in 2014, and I was still using master branch as the main branch. With this migration, I moved it over to main. For configuration reasons, it was having trouble moving over in my CI pipeline the first two or three builds. So please remember to check your settings.
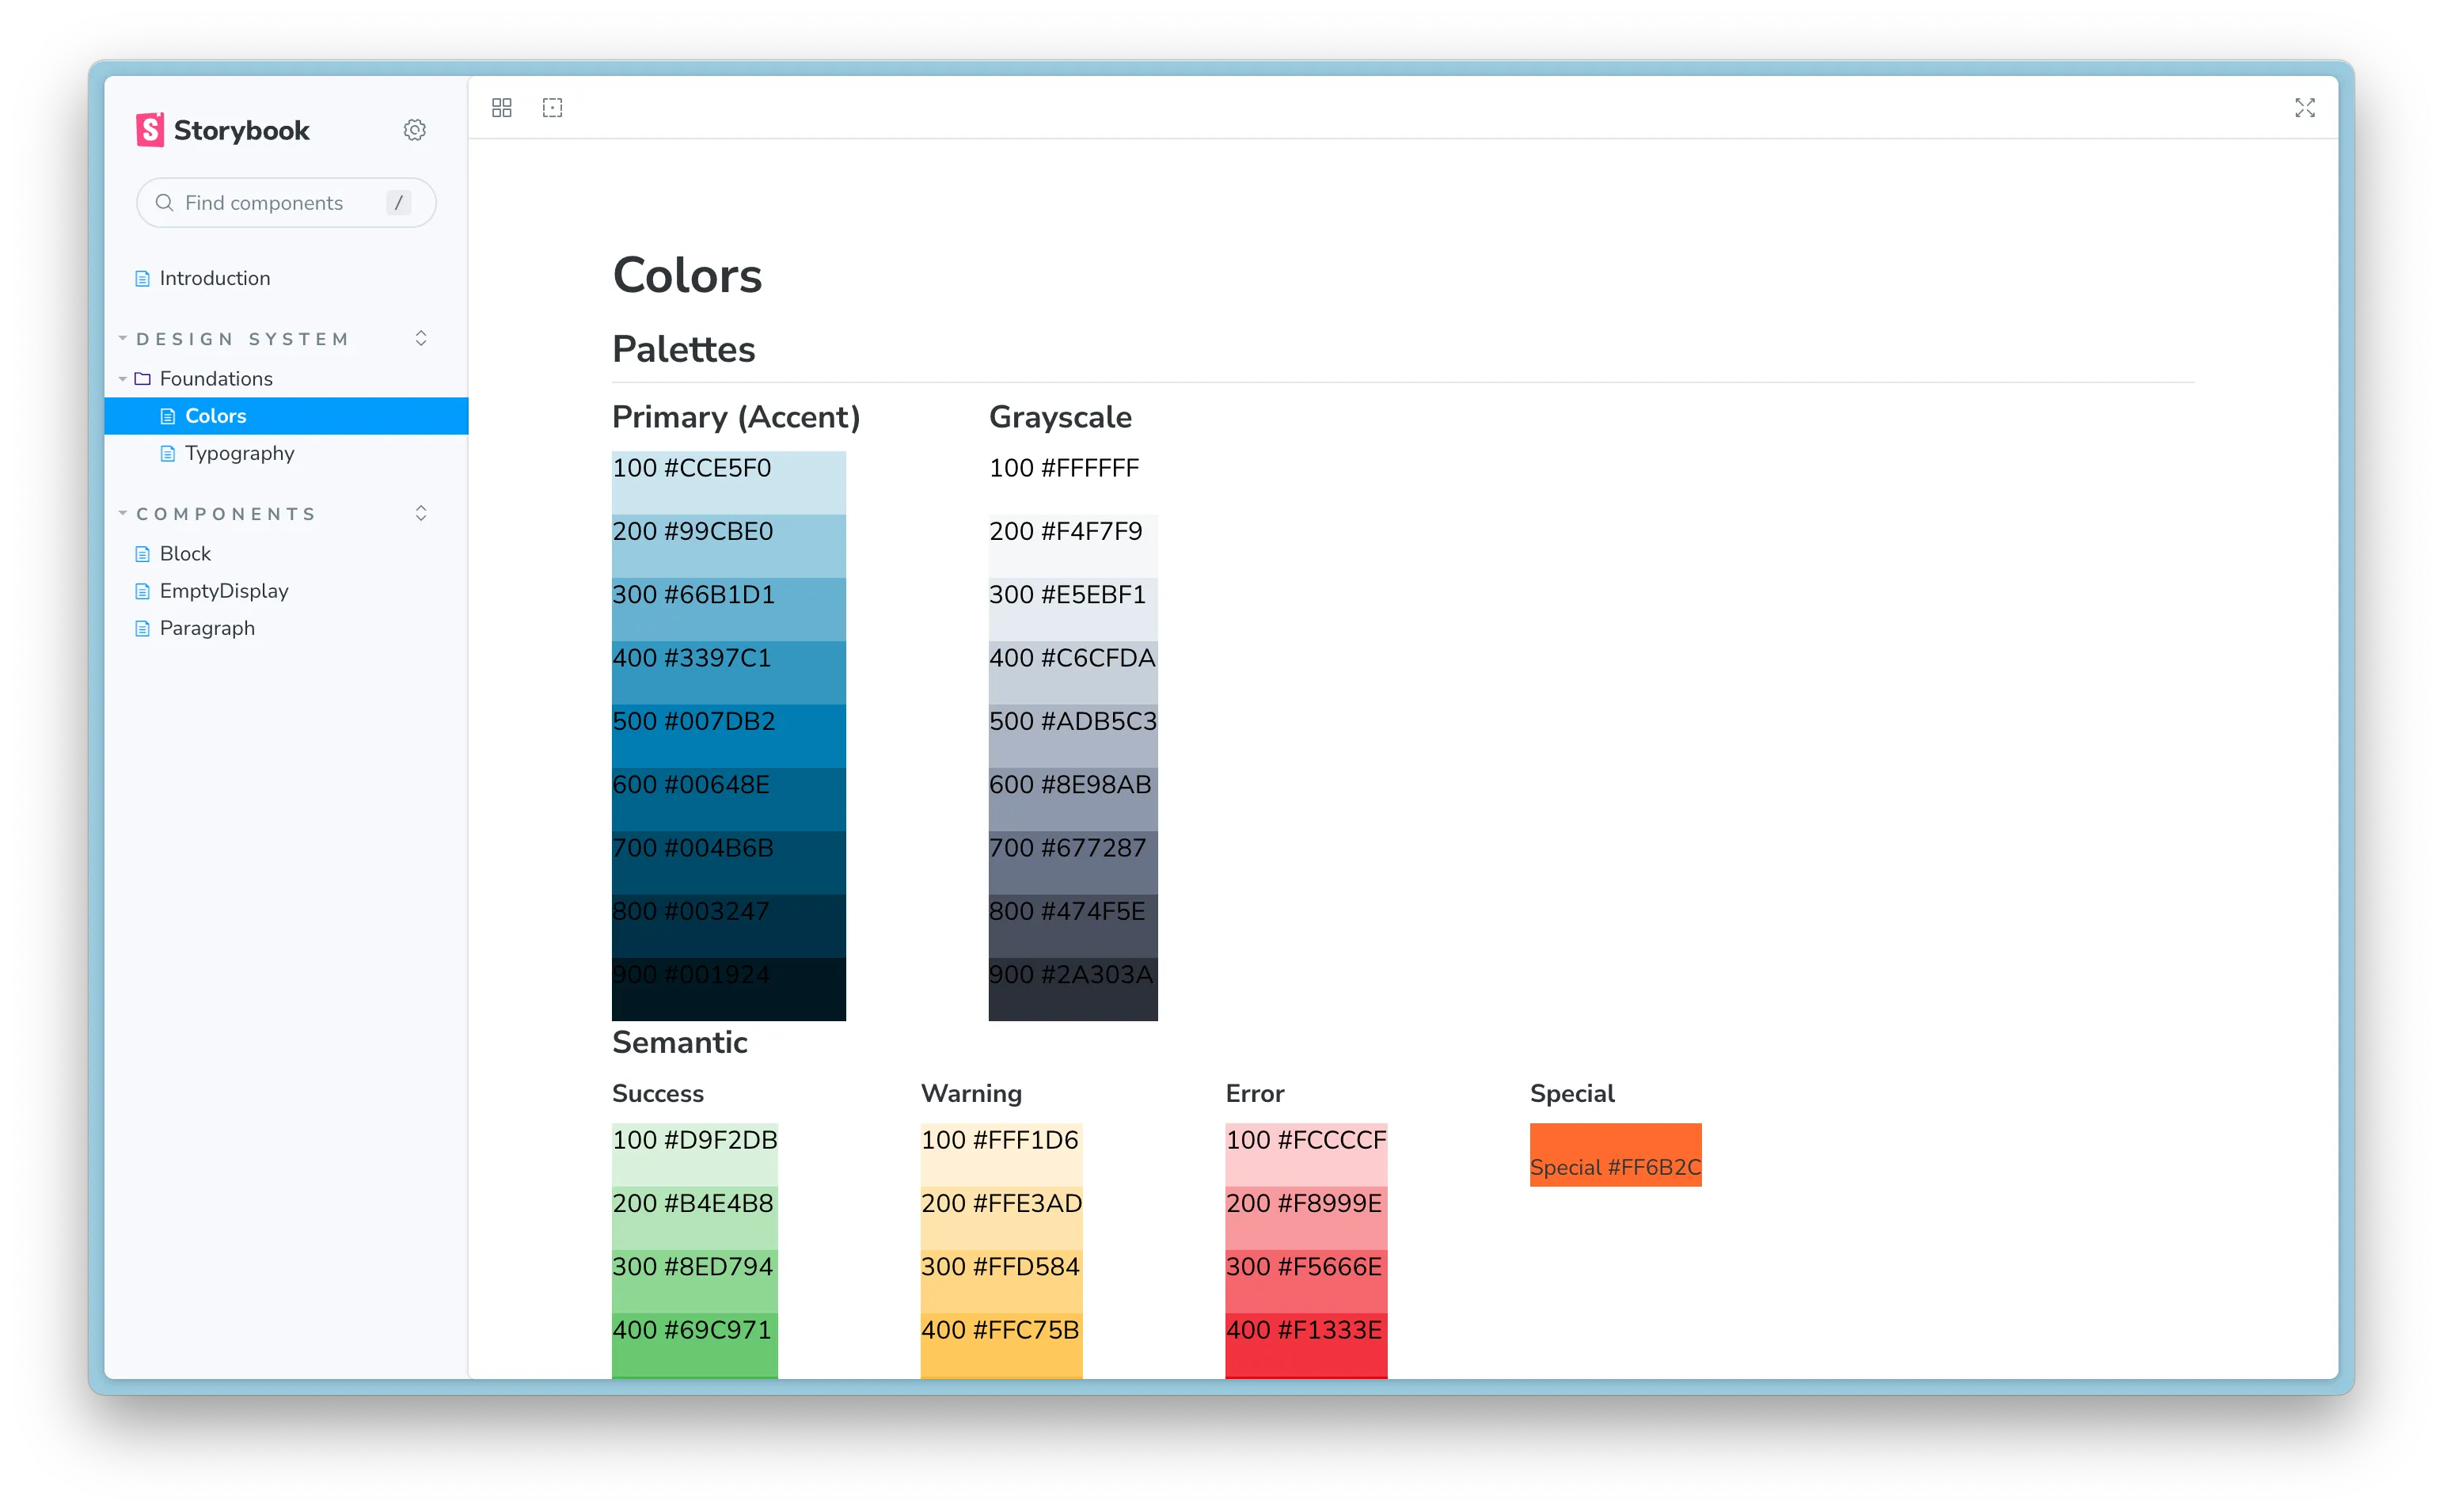
Styling
At first, Astro gives you the css from the Bear Blog. While the minimalism was great, that’s not my type of styling. So I adapted it until it started the look the way I wanted it to. Quickly, I realized this isn’t going to be scalable. While astro limits their styling to the component you’re working on, it wasn’t good enough. And the global styles weren’t to my taste.
I knew I wanted to use Tailwind in a full project. Previously, I’ve only used it for tiny pet projects. I went full in immersion. At first, my global styles were being modified by the base.css injected styles from Tailwind. I put too much effort in trying to modify them when I realized, “I started from a base project, and I don’t need these base style files”. That’s when I stopped caring about my blog’s styling conventions and migrated over to Tailwind’s conventions.
Sometimes, it’s hard to break hard habits. The mantra of “Convention over configuration”, as heralded by Ruby on Rails”, was echoing in the back of my mind. While I am not fully migrated over to Tailwind yet, I plan to.
Conclusion
There’s a bunch of things left-over from this migration that I have to still work on.
Analytics (ideally, an alternative to Google Analytics)
Add filters for the writing so you can filter by tags
Migrate over my Newsletter from TinyLetter to Buttondown
Overall though, I’m happy with my switch, and plan on working on my website more. Astro makes it incredible easy to add components from other libraries that I’ve worked with in the past (personally used React, Vue, Svelte, and Solid), so I plan on making more interactive blog posts and projects for this website in the future.
If you have any questions about the migration, want to give me feedback, or would like some help on your own Astro blog, feel free to email me. I’m always happy to help. (Email is in the footer of all pages).
In Astro, there’s this concept of islands. You have a few options on making your page interactive.
From the Astro docs,
these are your options.
---// Example: hydrating framework components in the browser.import DemoApp from "../../components/DemoApp.svelte";---<!-- This component's JS will begin importing when the page loads --><DemoApp client:load /><!-- This component's JS will not be sent to the client untilthe user scrolls down and the component is visible on the page --><DemoApp client:visible /><!-- This component won't render on the server, but will render on the client when the page loads --><DemoApp client:only="svelte" />
I’ll go ahead and try each of these and see what happens.
Initially from OpenAI’s fine-tuned GPT-3 version called Codex
AI-powered Code Generation, a smarter text expansion
Trained on open source code from Github
Reinforcement learning means it gets better with time, but maybe just incrementally
Prompt Engineering
Surprising use cases
Giving enough in the comments for generate decent code. Still needs some analysis
Giving a template for unit tests.
A lot of times, developers skip this step. By having an outline for it, the time to write tests go down
AI-powered tools as paired programming
Great alternative to the question and answer sites like StakeOverflow
Limitations
Answers are generative, meaning what you use in the prompt and how the model was training will determine the output
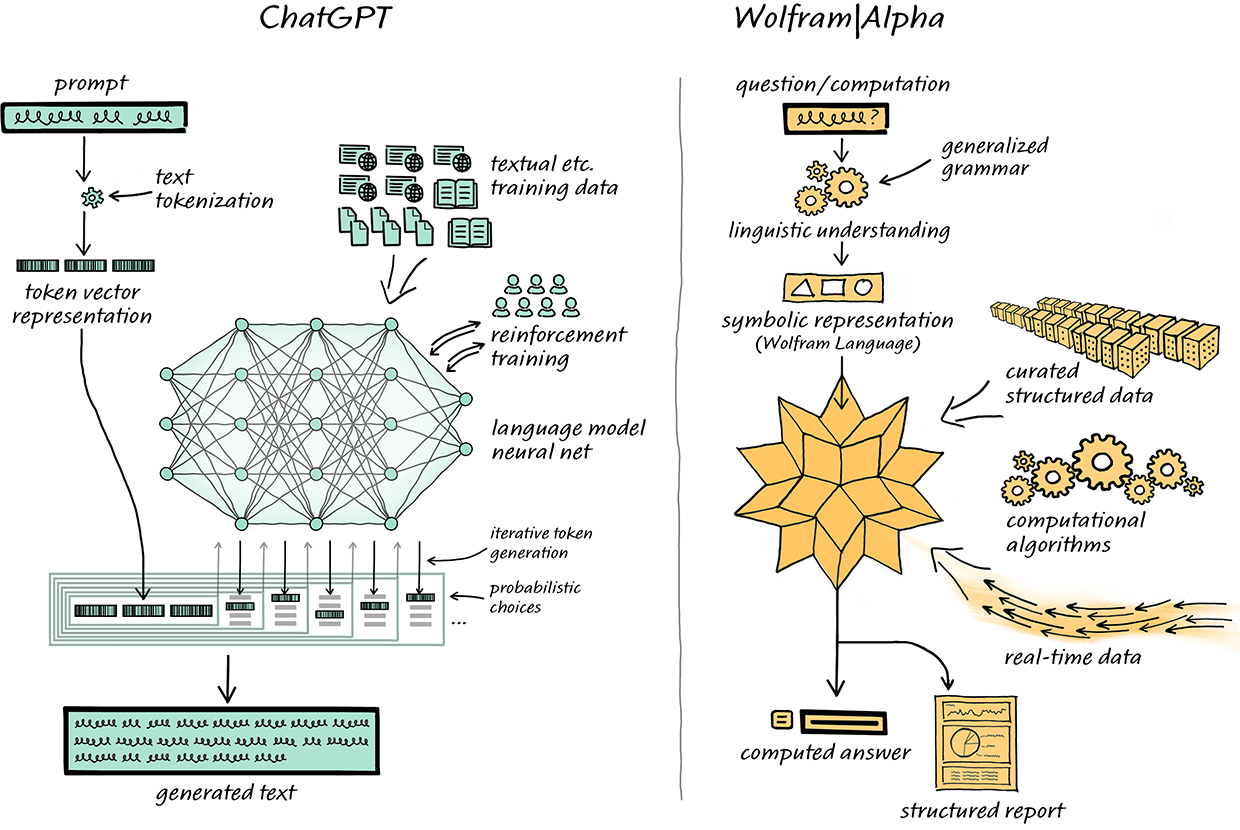
If you are looking for structured data, Google and Wolfram|Alpha do a much better job
Code that’s complexity is still hard to write
Can get very buggy
Training models in a rut w/ a Glitch Token
SMEs need to be the adult in the room
Legality
A class-action lawsuit against GitHub, OpenAI, and Microsoft claims that the training of Codex violated open source licensing agreements. The outcome could have legal implications for models that generate text, images, and other media as well.
Places like PromptBase are an open marketplace for text strings that generate interesting output
Limitations
Training set based off online images, which have inherit biases (see bad algorithms)
For example, sexualizing women unfairly
Concerns
Concern with legality
Concern with artists
ArtStation, an online community for visual artists, launched its own text-to-image features. Many artists, feeling threatened by computer programs that can reproduce an artist’s hard-won personal style in seconds, boycotted the website.
In the table editor, create a new table messages, and add columns for id, created_at, and content.
id should be a uuid
created_at should default now() and never be null
content is text and should never be null
Setting Up a Remix Project
Create a new remix project
Choose “Just the basics”
Choose Vercel as the service
npx create-remix chatter
For the remix project, you can find the main file in index.tsx
Query Supabase Data with Remix Loaders
npm i @supabase/supabase-js
Add supabase env vars to .env, which can be found in the Project Settings > API. Link
SUPABASE_URL={url}SUPABASE_ANON_KEY={anon_key}
Create a utils/supabase.ts file. Create createClient function
A ”!” can be used at the end of a variable so typescript doesn’t give us errors, if we know those will be available at runtime, like env vars
Supabase has row-level security enabled, meaning you have to write policies in order for the user to do CRUD operations (SELECT, INSERT, UPDATE, DELETE, and ALL).
We added a policy to allow all users to read.
Create the loader in the index page, using import { useLoaderData } from "@remix-run/react";, which will allow us to query supabase using the utils.
supabase.from("messages").select() reminds me a lot like mongodb’s client.
Generate TypeScript Type Definitions with the Supabase CLI
supabase gen types typescript --project-id akhdfxiwrelzhhhofvly > db_types.ts
We have to re-run this command every time we have DB updates
Now we use the db_types.ts into our supabase.ts file by adding a type to the createClient function
You can infer types by using typeof in Typescript. This is useful for showcasing what data’s type is in the Index functional component.
To make sure the data is always present, or an empty array rather than of type null, we use a null coalescing operator on the original data return { messages: data ?? [] };
Implement Authentication for Supabase with OAuth and Github
Enable Github OAuth using Supabase
In the supabase project, go to Authentication > Providers
Choose Github
In Github, go to Settings, Developer Settings > OAuth Apps
Create “Chatter”. Copy the Authorization callback URL
In supabase, enter the Client ID, Client Secret, and the Redirect URL.
The generated secret in Github goes away after a few minutes, so be quick
Create the login component in components/login and then add two buttons for logging in and out.
The handlers should be supabase.auth.signInWithOAuth and supabase.auth.signOut
Add the login component back into the index component.
You’ll notice a ReferenceError in that process is not defined because that should only run on the server.
Change the supabase.ts file to supabase.server.ts file. This shows that the supabase file should only be rendered on the server.
The root.tsx component has an Outlet depending on the route based off the routes files (file-based routing)
In the root component, we add the context in Outlet for the supabase instance.
This can now be used in the login file using useOutletContext.
Types can be added by exporting it from root.
type TypedSupabaseClient = SupabaseClient<Database>;
supabase uses Local Storage to store the OAuth tokens.
You can also check the users in the supabase project
Restrict Access to the Messages Table in a Database with Row Level Security (RLS) Policies
Add a column to our database called user_id and add a foreign key to it, with users and the key being id.
Disable Allow Nullable by adding the logged in user id to the first two messages. This can be found in the users table.
Re-run the db_types script
supabase gen types typescript --project-id akhdfxiwrelzhhhofvly > db_types.ts
Update the policy by changing the target roles to be authenticated.
Now only signed in users will be able to view the data.
Make Cookies the User Session Single Source of Truth with Supabase Auth Helpers
Auth tokens by default are stored in the client’s session, not on the server.
Remix is loading from the server’s session, which is null
npm i @supabase/auth-helpers-remix
We need to change the mechanism for the token to use cookies
Auth helpers allows us to use createServerClient and createBrowserClient to create the supabase instance correctly, based if it’s on the client or server.
You need request and response added in the supabase.server.ts
We need to do the same thing in the loader in root and index
Keep Data in Sync with Mutations Using Active Remix Loader Functions
There’s no update for pressing the button because the client doesn’t update the information after the initial load.
Remix has a revalidation hook.
Supabase has a auth state change hook
Combining these together, on server and client token change (either new token, or no longer has the token), then refetch data from loaders.
Securely Mutate Supabase Data with Remix Actions
To create a new message, we add Form from remix, which has a method post.
This is reminiscent of how forms worked alongside the HTML spec before
An action is created to insert the message, include the response headers from before (passing along the cookie)
The message won’t send yet until the supabase policy is set, so we add a policy for INSERT and make sure the user is authenticated and their user_id matches the one in supabase.
Subscribe to Database Changes with Supabase Realtime
Supabase sends out updates via websockets when there is a change to the database
I got a new Macbook at work, 13” w/ M2 Chip, and I thought it would be great to spend the day setting it up. The following is a document I had continued to write as I was going through every step of the way. This might inspire you to do the same, the next Macbook you start from fresh.
Brave Sync Code (Beware, this code should be private)
beach cheap hidden retire giggle gorilla tone pass length what spread march illegal episode fruit enjoy exact drive humble endless razor today follow treat boy
Brave shortcuts in URL bar
Brave Extensions
React Dev Tools
Redux Dev Tools
Apollo Dev Tools
Reader
iTerm2
Install pip3 through XCode Command Line Tools (CLT)
Create workspaces directory
Check if XCode is already installed
xcode-select -p
A M2 chip issue on brew is solved with the following
# Warning: /opt/homebrew/bin is not in your PATH.# - Run these three commands in your terminal to add Homebrew to your PATH:echo '# Set PATH, MANPATH, etc., for Homebrew.' >> /Users/jeremywong/.zprofileecho 'eval "$(/opt/homebrew/bin/brew shellenv)"' >> /Users/jeremywong/.zprofileeval "$(/opt/homebrew/bin/brew shellenv)"
Modify Fonts
NerdFonts - Iconic font aggregator, collection, & patcher. 3,600+ icons, 50+ patched fonts: Hack, Source Code Pro, more. Glyph collections: Font Awesome, Material Design Icons, Octicons, & more
fnm install 16npm loginnpm config set loglevel="warn"# sudo npm install netlify-cli -g# netlify login# npm i -g sign-bunny fortune-node parrotsay # fun little cli utilities to use# npm i -g undollar # for removing $# npm install -g npm-check-updates # for updating deps# sudo npm install -g trash-cli # to add a `trash` command to so you dont permanently delete files
A feature flag is a decision point in your code that can change the behavior of your application. Feature flags can either be temporary or permanent.
Temporary flags are often used to safely deploy changes to your application or to test new behaviors against old ones. After a new behavior is being used by 100% of your users, the flag is intended to be removed.
Permanent flags give you a way to control the behavior of your application at any time. You might use a permanent flag to create a kill-switch or to reveal functionality only to specific users.
Feature flags are context sensitive. The code path token can change based on the context provided; for example, the user’s identity, the plan they’ve paid for, or any other data.
Feature flags can be used to control which users can see each change. This decouples the act of deploying from the act of releasing.
What do we do today
We have the ability to switch temp flags as kill switch for all customers (new field in result analytics). The permanent flags are controlled per customer (e.g. env mapping). A sub-group of those permanent flags control company integrations with third party services (e.g. Terra).
What are we lacking
What we don’t have is fine control of flags for rollout — using context to switch on/off flags by user, company, or other groups. When introducing new flags, we don’t have a standardized way in storing them in the same place. See companyFeatureToggles vs. companyIntegrations vs. featureFlags. We don’t highlighting flag dependencies. Lastly, permanent flags are limited to a per-company basis.
Definitions
Safety valves are permanent feature flags that you can use to quickly disable or limit nonessential parts of your application to keep the rest of the application healthy.
Kill Switches are permanent feature flags that allows you to quickly turn it off a feature if it’s performing poorly.
Circuit Breakers have the ability to switch off feature flags if they meet certain monitoring criteria.
An Operational Feature Flag are flags around features invisible to customers, such as a new backend improvement or infrastructure change. Operational flags give DevOps teams powerful controls that they can use to improve availability and mitigate risk.
Feature Flag Management Platforms
LaunchDarkly
Split
CloudBees
Deployments
Types of Deployments
There are different types of deployments:
Canary Releases - User groups who would like to opt in
Ring Deployments - Different user segments at a time - e.g. beta or power users
Percentage-based Deployments - Start with low percentage, then move to higher. For operational changes
Each of these can be implemented using feature flags.
Feature flags and blue/green deploys are complementary techniques. Although there are areas of overlap, each approach has distinct benefits, and the best strategy is to use both.
Testing
It isn’t necessary (or even possible) to test every combination of feature flags. Testing each variation of a flag in isolation (using default values for the other flags) is usually enough, unless there’s some known interaction between certain flags.
Library Code
Another decision that affects testing is whether you should use feature flags in reusable library code. I think the answer is no—flags are an application-level concern, not a library concern.
Feature Flag Clean-up
Cleaning up flags aggressively is the key to preventing technical debt from building up. There’s no royal road to flag cleanup, but there are some processes that make it manageable.
A stale flag is a temporary flag that is no longer in use and has not been cleaned up. Too many stale flags are a form of technical debt and an antipattern that you should avoid.
Documentation
Document changes It’s good practice to maintain a log of flag updates. It’s even more helpful to leave a comment with every change. When something is going unexpectedly wrong, being able to quickly see if anything has changed recently (and why it did) is an invaluable asset.
Name your flags well It’s also important to help your team understand what flags are for as easily as possible. So, adopt a naming convention that makes it clear at first glance what a flag is for, what part of the system it affects, and what it does.
Configuration Management
Feature management platforms solve many of these change management problems, but I still do not recommend moving configuration data into feature flags.
Configuration parameters are typically stored in files, environment variables, or services like Consul or Redis. As services become more complex, configuration management becomes a real concern. Tasks like versioning configuration data, rolling back changes, and promoting configuration changes across environments become cumbersome and error prone.
Rather than migrate all configuration data into feature flags, I recommend introducing feature flags selectively on top of whatever configuration management mechanism is in place (files, environment variables, etc.). These flags should be introduced only on an as-needed basis. For example, imagine that you’re trying to manage a database migration via feature flags.
If you had managed your migration by moving the entire database configuration into a feature flag, perhaps by creating a multivariate database-configuration flag, you’d need to keep the flag in place permanently.
Design for Failure
Design multiple layers of redundancy. When you write code you must consider what should happen if the feature flag system fails to respond. Most feature flag APIs include the ability to specify a default option—what is to be served if no other information is available. Ensure that you have a default option and that your defaults are safe and sane.
Flag Distribution via a Networked System
In any networked system there are two methods to distribute information. Polling is the method by which the endpoints (clients or servers) periodically ask for updates. Streaming, the second method, is when the central authority pushes the new values to all the endpoints as they change.
Technique
Pros
Cons
Polling
Simple, Easily Cached
Inefficient. All clients need to connect momentarily, regardless of whether there is a change. Changes require roughly twice the polling interval to propagate to all clients. Because of long polling intervals, the system could create a “split brain” situation, in which both new flag and old flag states exist at the same time.
Streaming
Efficient at scale. Each client receives messages only when necessary. Fast Propagation. Changes can be pushed out to clients in real time.
Requires the central service to maintain connections for every client. Assumes a reliable network.
Relay Proxy
For those customers that have the need for another layer of redundancy on top of the four layers provided by our core service (multiple AWS availability zones, the Fastly CDN, local caching, and default values), we also offer the LaunchDarkly relay proxy (formally known as LD-relay). LD-relay is a small application in a Docker container that can be deployed in your own environment, either in the cloud of your choice or on premise in your datacenter(s).
The Relay Proxy is a small Go application that connects to the LaunchDarkly streaming API and proxies that connection to clients within an organization’s network.
We recommend that customers use the Relay Proxy if they are on an Enterprise plan and primarily use feature flagging in server-side applications. The Relay Proxy adds an additional layer of redundancy in the case of a LaunchDarkly outage.
The following was written for interns starting out with Javascript at Clear Labs.
Base Foundation
Whether this is your first time with Javascript or as a seasoned developer, you should have some base knowledge prior to working with React. While you can learn a framework, it’s more beneficial to understand the language it is written in. For example, what are promises and how does javascript handle asynchronous actions? What is the event loop? And how does Javascript fit in?
Here are some resources to get you started
Freecodecamp - if you have no foundational knowledge of Javascript or need a refresher for the Javascript syntax, start here
MDN Javascript - Mozilla’s documentation on where to get started with Javascript
MDN Promises - Mozilla’s documentation on promises
Async functions - Mozilla’s documentation on handling promises using async functions
Error Handling - Mozilla’s documentation about browser javascript errors
Going Deeper
Many developers find Javascript hard because it started as a scripting language, the syntax looks ugly, and you get these TypeErrors if you’re not careful. That said, with some major changes to the language since Node.js and Google’s V8 engine, Javascript has become a more seasoned programming language. You can develop classes, write generator functions, handle asynchronous events, and enumerate over lists much easier.
Once you’ve started with the basics above, feel free to continue to hone your skills with a deeper understanding of Javascript.
ES2015+ - a new set of functionality in Javascript that allows you to write more effective code. See the Ecmascript section below for more information.
You Don’t Know JS - A series of books written by Kyle Simpson that talks about diving deep into the core mechanisms of Javascript
Ecmascript
JavaScript is a subset of ECMAScript. JavaScript is basically ECMAScript at its core but builds upon it. Languages such as ActionScript, JavaScript, JScript all use ECMAScript as its core. As a comparison, AS/JS/JScript are 3 different cars, but they all use the same engine… each of their exteriors is different though, and there have been several modifications done to each to make it unique.
The history is, Brendan Eich created Mocha which became LiveScript, and later JavaScript. Netscape presented JavaScript to Ecma International, which develops standards and it was renamed to ECMA-262 aka ECMAScript.
It’s important to note that Brendan Eich’s “JavaScript” is not the same JavaScript that is a dialect of ECMAScript. He built the core language which was renamed to ECMAScript, which differs from the JavaScript which browser-vendors implement nowadays.
If your base understanding of Javascript is prior to ES6, you’ll want to read up on the basics. To start, arrow functions, classes, let and const statements are used throughout the app.
Arrow Functions
Often times we have nested functions in which we would like to preserve the context of this from its lexical scope. An example is shown below:
function Person(name) { this.name = name;}Person.prototype.prefixName = function (arr) { return arr.map(function (character) { return this.name + character; // Cannot read property 'name' of undefined });};
One common solution to this problem is to store the context of this using a variable:
function Person(name) { this.name = name;}Person.prototype.prefixName = function (arr) { var that = this; // Store the context of this return arr.map(function (character) { return that.name + character; });};
We can also pass in the proper context of this:
function Person(name) { this.name = name;}Person.prototype.prefixName = function (arr) { return arr.map(function (character) { return this.name + character; }, this);};
As well as bind the context:
function Person(name) { this.name = name;}Person.prototype.prefixName = function (arr) { return arr.map( function (character) { return this.name + character; }.bind(this) );};
Using Arrow Functions, the lexical value of this isn’t shadowed and we can re-write the above as shown:
function Person(name) { this.name = name;}Person.prototype.prefixName = function (arr) { return arr.map((character) => this.name + character);};
Best Practice: Use Arrow Functions whenever you need to preserve the lexical value of this.
Arrow Functions are also more concise when used in function expressions which simply return a value:
Best Practice: Use Arrow Functions in place of function expressions when possible.
Template Literals
Using Template Literals, we can now construct strings that have special characters in them without needing to escape them explicitly.
var text = 'This string contains "double quotes" which are escaped.';let text = `This string contains "double quotes" which don't need to be escaped anymore.`;
Template Literals also support interpolation, which makes the task of concatenating strings and values:
var name = "Tiger";var age = 13;console.log("My cat is named " + name + " and is " + age + " years old.");
Much simpler:
const name = "Tiger";const age = 13;console.log(`My cat is named ${name} and is ${age} years old.`);
In ES5, we handled new lines as follows:
var text = "cat\n" + "dog\n" + "nickelodeon";
Or:
var text = ["cat", "dog", "nickelodeon"].join("\n");
Template Literals will preserve new lines for us without having to explicitly place them in:
let text = `catdognickelodeon`;
Template Literals can accept expressions, as well:
let today = new Date();let text = `The time and date is ${today.toLocaleString()}`;
Classes
Prior to ES6, we implemented Classes by creating a constructor function and adding properties by extending the prototype:
class Personal extends Person { constructor(name, age, gender, occupation, hobby) { super(name, age, gender); this.occupation = occupation; this.hobby = hobby; } incrementAge() { super.incrementAge(); this.age += 20; console.log(this.age); }}
Best Practice: While the syntax for creating classes in ES6 obscures how implementation and prototypes work under the hood, it is a good feature for beginners and allows us to write cleaner code.
Let / Const
Besides var, we now have access to two new identifiers for storing values —let and const. Unlike var, let and const statements are not hoisted to the top of their enclosing scope.
An example of using var:
var snack = "Meow Mix";function getFood(food) { if (food) { var snack = "Friskies"; return snack; } return snack;}getFood(false); // undefined
However, observe what happens when we replace var using let:
let snack = "Meow Mix";function getFood(food) { if (food) { let snack = "Friskies"; return snack; } return snack;}getFood(false); // 'Meow Mix'
This change in behavior highlights that we need to be careful when refactoring legacy code which uses var. Blindly replacing instances of var with let may lead to unexpected behavior.
Note: let and const are block scoped. Therefore, referencing block-scoped identifiers before they are defined will produce a ReferenceError.
console.log(x); // ReferenceError: x is not definedlet x = "hi";
Best Practice: Leave var declarations inside of legacy code to denote that it needs to be carefully refactored. When working on a new codebase, use let for variables that will change their value over time, and const for variables which cannot be reassigned.
Destructuring allows us to extract values from arrays and objects (even deeply nested) and store them in variables with a more convenient syntax.
Destructuring Arrays
var arr = [1, 2, 3, 4];var a = arr[0];var b = arr[1];var c = arr[2];var d = arr[3];let [a, b, c, d] = [1, 2, 3, 4];console.log(a); // 1console.log(b); // 2
Destructuring Objects
var luke = { occupation: "jedi", father: "anakin" };var occupation = luke.occupation; // 'jedi'var father = luke.father; // 'anakin'let luke = { occupation: "jedi", father: "anakin" };let { occupation, father } = luke;console.log(occupation); // 'jedi'console.log(father); // 'anakin'
Parameters
In ES5, we had varying ways to handle functions which needed default values, indefinite arguments, and named parameters. With ES6, we can accomplish all of this and more using more concise syntax.
Default Parameters
function addTwoNumbers(x, y) { x = x || 0; y = y || 0; return x + y;}
In ES6, we can simply supply default values for parameters in a function:
function addTwoNumbers(x = 0, y = 0) { return x + y;}addTwoNumbers(2, 4); // 6addTwoNumbers(2); // 2addTwoNumbers(); // 0
Symbols
Symbols have existed prior to ES6, but now we have a public interface to using them directly. Symbols are immutable and unique and can be used as keys in any hash.
Symbol();
Calling Symbol() or Symbol(description) will create a unique symbol that cannot be looked up globally. A Use case for Symbol() is to patch objects or namespaces from third parties with your own logic, but be confident that you won’t collide with updates to that library. For example, if you wanted to add a method refreshComponent to the React.Component class, and be certain that you didn’t trample a method they add in a later update:
Symbol.for(key) will create a Symbol that is still immutable and unique, but can be looked up globally. Two identical calls to Symbol.for(key) will return the same Symbol instance. NOTE: This is not true for Symbol(description):
A common use case for Symbols, and in particular with Symbol.for(key) is for interoperability. This can be achieved by having your code look for a Symbol member on object arguments from third parties that contain some known interface. For example:
function reader(obj) { const specialRead = Symbol.for("specialRead"); if (obj[specialRead]) { const reader = obj[specialRead](); // do something with reader } else { throw new TypeError("object cannot be read"); }}
A notable example of Symbol use for interoperability is Symbol.iterator which exists on all iterable types in ES6: Arrays, strings, generators, etc. When called as a method it returns an object with an Iterator interface.
Maps is a much needed data structure in JavaScript. Prior to ES6, we created hash maps through objects:
var map = new Object();map[key1] = "value1";map[key2] = "value2";
However, this does not protect us from accidentally overriding functions with specific property names:
> getOwnProperty({ hasOwnProperty: 'Hah, overwritten'}, 'Pwned');> TypeError: Property 'hasOwnProperty' is not a function
Actual Maps allow us to set, get and search for values (and much more).
let map = new Map();> map.set('name', 'david');> map.get('name'); // david> map.has('name'); // true
The most amazing part of Maps is that we are no longer limited to just using strings. We can now use any type as a key, and it will not be type-cast to a string.
Note: Using non-primitive values such as functions or objects won’t work when testing equality using methods such as map.get(). As such, stick to primitive values such as Strings, Booleans and Numbers.
We can also iterate over maps using .entries():
for (let [key, value] of map.entries()) { console.log(key, value);}
Promises
Promises allow us to turn our horizontal code (callback hell):
func1(function (value1) { func2(value1, function (value2) { func3(value2, function (value3) { func4(value3, function (value4) { func5(value4, function (value5) { // Do something with value 5 }); }); }); });});
Into vertical code:
func1(value1)
  .then(func2)
  .then(func3)
  .then(func4)
  .then(func5, (value5) => {
    // Do something with value 5
  });
Prior to ES6, we used bluebird or Q. Now we have Promises natively:
new Promise((resolve, reject) => reject(new Error("Failed to fulfill Promise"))).catch((reason) => console.log(reason));
Where we have two handlers, resolve (a function called when the Promise is fulfilled) and reject (a function called when the Promise is rejected).
Benefits of Promises: Error Handling using a bunch of nested callbacks can get chaotic. Using Promises, we have a clear path to bubbling errors up and handling them appropriately. Moreover, the value of a Promise after it has been resolved/rejected is immutable - it will never change.
Here is a practical example of using Promises:
var request = require("request");return new Promise((resolve, reject) => { request.get(url, (error, response, body) => { if (body) { resolve(JSON.parse(body)); } else { resolve({}); } });});
We can also parallelize Promises to handle an array of asynchronous operations by using Promise.all():
let urls = [ "/api/commits", "/api/issues/opened", "/api/issues/assigned", "/api/issues/completed", "/api/issues/comments", "/api/pullrequests",];let promises = urls.map((url) => { return new Promise((resolve, reject) => { $.ajax({ url: url }).done((data) => { resolve(data); }); });});Promise.all(promises).then((results) => { // Do something with results of all our promises});
Generators
Similar to how Promises allow us to avoid callback hell, Generators allow us to flatten our code - giving our asynchronous code a synchronous feel. Generators are essentially functions which we can pause their execution and subsequently return the value of an expression.
A simple example of using generators is shown below:
Where next will allow us to push our generator forward and evaluate a new expression. While the above example is extremely contrived, we can utilize Generators to write asynchronous code in a synchronous manner:
// Hiding asynchronousity with Generators
function request(url) { getJSON(url, function (response) { generator.next(response); });}
And here we write a generator function that will return our data:
function* getData() { var entry1 = yield request("https://some_api/item1"); var data1 = JSON.parse(entry1); var entry2 = yield request("https://some_api/item2"); var data2 = JSON.parse(entry2);}
By the power of yield, we are guaranteed that entry1 will have the data needed to be parsed and stored in data1.
While generators allow us to write asynchronous code in a synchronous manner, there is no clear and easy path for error propagation. As such, as we can augment our generator with Promises:
function request(url) { return new Promise((resolve, reject) => { getJSON(url, resolve); });}
And we write a function which will step through our generator using next which in turn will utilize our request method above to yield a Promise:
function iterateGenerator(gen) { var generator = gen(); (function iterate(val) { var ret = generator.next(); if (!ret.done) { ret.value.then(iterate); } })();}
By augmenting our Generator with Promises, we have a clear way of propagating errors through the use of our Promise .catch and reject. To use our newly augmented Generator, it is as simple as before:
iterateGenerator(function* getData() { var entry1 = yield request("https://some_api/item1"); var data1 = JSON.parse(entry1); var entry2 = yield request("https://some_api/item2"); var data2 = JSON.parse(entry2);});
We were able to reuse our implementation to use our Generator as before, which shows their power. While Generators and Promises allow us to write asynchronous code in a synchronous manner while retaining the ability to propagate errors in a nice way, we can actually begin to utilize a simpler construction that provides the same benefits: async-await.
Async Await
While this is actually an upcoming ES2016 feature, async await allows us to perform the same thing we accomplished using Generators and Promises with less effort:
var request = require("request");function getJSON(url) { return new Promise(function (resolve, reject) { request(url, function (error, response, body) { resolve(body); }); });}async function main() { var data = await getJSON(); console.log(data); // NOT undefined!}main();
Under the hood, it performs similarly to Generators. I highly recommend using them over Generators + Promises. A great resource for getting up and running with ES7 and Babel can be found here.
Getter and setter functions
ES6 has started supporting getter and setter functions within classes. Using the following example:
class Employee { constructor(name) { this._name = name; } get name() { if (this._name) { return "Mr. " + this._name.toUpperCase(); } else { return undefined; } } set name(newName) { if (newName == this._name) { console.log("I already have this name."); } else if (newName) { this._name = newName; } else { return false; } }}var emp = new Employee("James Bond");// uses the get method in the backgroundif (emp.name) { console.log(emp.name); // Mr. JAMES BOND}// uses the setter in the backgroundemp.name = "Bond 007";console.log(emp.name); // Mr. BOND 007
Latest browsers are also supporting getter/setter functions in Objects and we can use them for computed properties, adding listeners and preprocessing before setting/getting:
var person = { firstName: "James", lastName: "Bond", get fullName() { console.log("Getting FullName"); return this.firstName + " " + this.lastName; }, set fullName(name) { console.log("Setting FullName"); var words = name.toString().split(" "); this.firstName = words[0] || ""; this.lastName = words[1] || ""; },};person.fullName; // James Bondperson.fullName = "Bond 007";person.fullName; // Bond 007
ES6 Modules
Prior to ES6, we used libraries such as Browserify to create modules on the client-side, and require in Node.js. With ES6, we can now directly use modules of all types (AMD and CommonJS).
Exporting in ES6
With ES6, we have various flavors of exporting. We can perform Named Exports:
export let name = 'David';export let age = 25;
As well as exporting a list of objects:
function sumTwo(a, b) { return a + b;}function sumThree(a, b, c) { return a + b + c;}export { sumTwo, sumThree };
We can also export functions, objects and values (etc.) simply by using the export keyword:
export function sumTwo(a, b) { return a + b;}export function sumThree(a, b, c) { return a + b + c;}
And lastly, we can export default bindings:
function sumTwo(a, b) { return a + b;}function sumThree(a, b, c) { return a + b + c;}let api = { sumTwo, sumThree,};export default api;/* Which is the same as * export { api as default }; */
Best Practices: Always use the export default method at the end of the module. It makes it clear what is being exported, and saves time by having to figure out what name a value was exported as. More so, the common practice in CommonJS modules is to export a single value or object. By sticking to this paradigm, we make our code easily readable and allow ourselves to interpolate between CommonJS and ES6 modules.
Importing in ES6
ES6 provides us with various flavors of importing. We can import an entire file:
import "underscore";
It is important to note that simply importing an entire file will execute all code at the top level of that file.
Similar to Python, we have named imports:
import { sumTwo, sumThree } from "math/addition";
We can also rename the named imports:
import { sumTwo as addTwoNumbers, sumThree as sumThreeNumbers,} from "math/addition";
In addition, we can import all the things (also called namespace import):
import * as util from "math/addition";
Lastly, we can import a list of values from a module:
import * as additionUtil from "math/addition";const { sumTwo, sumThree } = additionUtil;
Importing from the default binding like this:
import api from "math/addition";// Same as: import { default as api } from 'math/addition';
While it is better to keep the exports simple, but we can sometimes mix default import and mixed import if needed. When we are exporting like this:
// foos.jsexport { foo as default, foo1, foo2 };
We can import them like the following:
import foo, { foo1, foo2 } from "foos";
When importing a module exported using commonjs syntax (such as React) we can do:
import React from "react";const { Component, PropTypes } = React;
This can also be simplified further, using:
import React, { Component, PropTypes } from "react";
Note: Values that are exported are bindings, not references. Therefore, changing the binding of a variable in one module will affect the value within the exported module. Avoid changing the public interface of these exported values.
Additional Resources
In addition to those features of ES6+, you’ll notice other features that you can incrementally learn as you go along. Here’s an incomplete list.
The following was written for interns starting out with browsers at Clear Labs.
Javascript was initially developed as a scripting language for the browser. The language has expanded into servers, IoT devices, serverless functions. But let’s take it a step back and talk more about its initial use case with browsers.
Back in the early days of the Web, developers wanted to handle more than reading documents. Forms were introduced to start this interactivity, and soon, developers wanted more APIs. These set of APIs for browsers, known as DOM APIs, became the way a developer could interact with the browser using Javascript. Over the years, this has matured into a large set of APIs.
You can find a separate wiki page for the DOM APIs that we use for our app.
Performance
The DOM, or the document object model, is a representation of the HTML on the page. The browser parses the HTML and puts that HTML in a representation called the DOM. In addition, the browser also parses the CSS and places it in a similar representation known as the CSSDOM. When these two are complete, a paint event can occur which can be shown to the user.
Javascript’s execution is slightly different than HTML and CSS. If Javascript gets loaded prior to the CSSDOM completion, it could block the browser’s paint execution until that Javascript is loaded. This phenomenon, known as Blocking, has some effects on performance.
For a deeper dive into browser performance, here are two (paid) books.
High Performance Web Sites - Written in 2007, still holds value in how browsers run. Some syntax has been updated, but the general advice is sound. It is highly likely you can find this book for free
Even Faster Websites - Written in 2009, a good follow-up to “High Performance Web Sites” that tackles additional topics about Javascript, the Browser, and the Network
To understand blocking, you have to understand the event loop. The following resource is a great primer on the event loop.
What the heck is the event loop anyway? - A Youtube video conference talk on how the event loop works. It also goes over some special topics of multi-threading with Javascript.
Event Handling
One of Javascript’s purposes is to handle events from the user. You could write some code like this:
var input = document.getElementById("input-text-username");input.onchange((event) => { // Do something with the event console.log(event);});
The onchange attribute is function that takes a callback. A callback is a function that gets triggered when the event is triggered. Any event that takes place on the DOM can include a callback, for example, focus in on the element or mouseover the element.
The first number is the MAJOR version. The next is the MINOR version. Last digit is the PATCH version.
Patch Update
In our example table above, react-dates has a patch version update.
21.5.0 -> 21.5.1
The last digit changed from 0 to 1. That means the version is backwards compatible.
Usually this means the package has bug fixes.
You can safely update the package.json with this package without doing any checks.
Minor Update
In our example table above, normalizr has a minor version update.
3.4.1 -> 3.5.0
The second digit changed from 4 to 5. That means the version should be backwards compatible.
Usually this means the package has features added.
You can sometimes safely update the package.json with this package.
Use your intuition if you need to check the pacakage in the app.
For example, if the package type is a dev dependency, most likely you don’t have to make changes.
The example package normalizr would fall under this case, and you can safely upgrade.
If there’s a new API or function worth exploring, make some changes and see how they work, if they apply to our application.
Major Update
In our example table above, babel-jest has a major version update.
24.9.0 -> 25.1.0
The first digit changed from 24 to 25. That means the version is not backwards compatible.
Usually this means the package API has changed.
In some cases, it may be because they have dropped support for an old version of Node. YMMV
You can never safely update the package.json with this package.
Do the following:
Check the CHANGELOG.md or releases Github page. Figure out what the change is
If there are API changes, read up on what the changes are. If they are fundamental and big, do not add. Make a task ticket to upgrade.
Sometimes the library might be popular. They may have a blog post on this. (e.g. Storybook, Apollo, React, and Styled-Components)
If it’s for dropped support for an older version of Node, go ahead and upgrade
For all other changes, upgrade locally, then see if anything in the App breaks. Also check Storybook and tests to see if anything breaks.
Be wary of major changes. When in doubt, as a teammate.